
Start-up / Basic Configuration
Preferably, a simple studio configuration is the best choice when starting from scratch. Because just like with any new hobby or skillset, by attempting too much too early:
- one can get overwhelmed
- one can get discouraged
- eventually one quits early on
Nowadays, the simplest configuration for a keyboardist's home recording studio consists of only a couple of key-items:
- Suitable laptop or computer
- DAW / integrated plugins and sounds
- Keyboard (e.g. Masterkeyboard)
- Headphones
- Some cables
With this very simple and affordable configuration, music production nowadays is possible at a very good quality. In contrast, in analog times back in the 1970s, much more money and components were needed to start a home recording studio from scratch. But let's focus on the current situation in the remaining article.
This basic configuration has a considerable further advantage. It will give plenty of flexibility to further expand the home studio to growing needs, is mobile and portable and not overly complex in setting-up and configuring it.
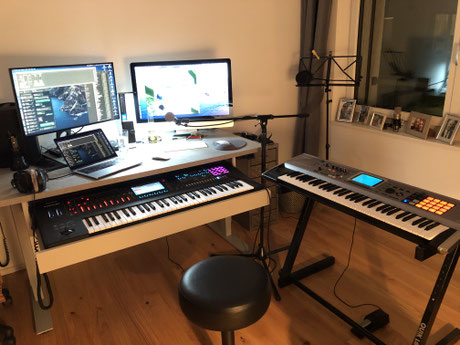
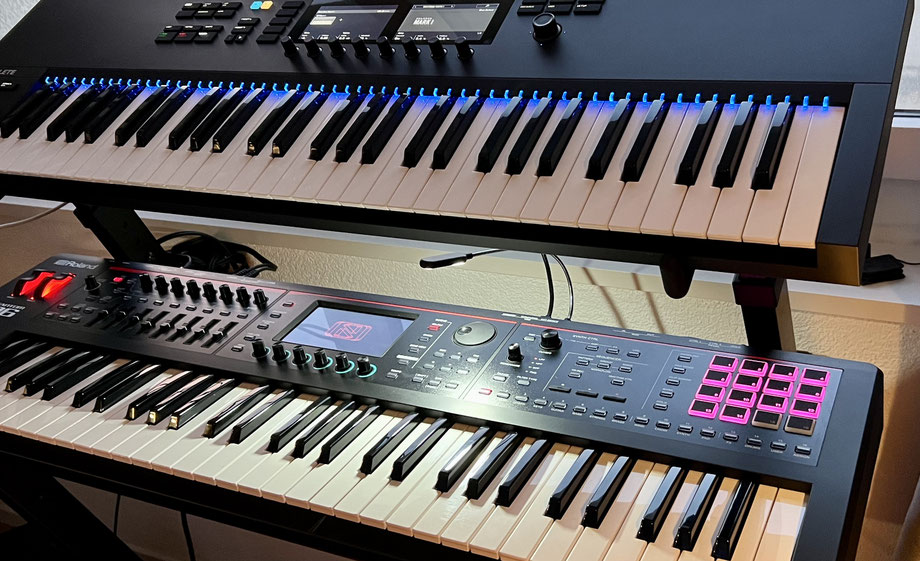
Now, when you look into the list of gear that is part of my LakeView Studio, you will find exactly these very basic components (among much more):
- MacBook Pro M1 (or comparable laptop)
- Garageband including sounds and plugins (all included / free when buying a Mac)
- Masterkeyboard NEKTAR Impact LX49+ (49 keys)
- Headphones (AirPods3 or Beyerdynamic DT-770 / Pro)
Quick Tip:
Mainstage is very affordable and contains all plugins / sounds / Apple loops of Logic Pro X, the professional DAW (digital audio workstation) which is data compatible to Garageband (the reduced "brother" or Logic Pro X).
The immense sound library Garageband and especially Mainstage are providing, along with the numerous plugins and apple loops being part of the software, will not limit your musicality for a long time - guaranteed. With Apple's AirPods3 headphones and the most recent Logic Pro X (10.7.x) even spatial audio productions are possible nowadays at an ultimately affordable price.
However, one limitation of this simple configuration is that voice recording/s or recording of other external instruments is not possible. For this, an external audio interface is needed.
Advanced Configuration
For a more advanced configuration of a keyboarded-oriented home recording studio some additional key-items may be added:
- Suitable laptop or computer
- DAW / integrated plugins and sounds
- Keyboard (e.g. Masterkeyboard)
- Headphones
- Some cables
- Audio interface
- Microphone & Mic stand
- Studio Monitor Speakers
- Additional gadgets (e.g. pop filter, screen shield)
The audio interface may be added as an additional stand-alone unit or be integrated into a more advanced keyboard workstation (e.g. Roland Fantom & Fantom-O series or others). The latter has the considerable advantage of a more integrated and portable configuration. The audio interface adds three main advantages that the simple conifuguration does not have:
- Recording of human voices (provided a mic is available, see below)
- Recording of other instruments (e.g. guitar, brass, acoustic instruments)
- Online music rehearsals across the internet (provided additional software like Jamulus or KOORD.LIVE is being used).
The addition of a studio microphone eliminates the restriction of the simple configuration and allows voice recordings. A pop filter and a screen shield are useful additional gadgets when voice recordings are planned to be added to the production, reducing unwanted noises and/or unpleasant vocal artifacts known as popping, which is a low frequency blast of air caused by the pronounciation of "P" and "B" sounds. The screen shield further reduces or eliminates the general noise floor in your home studio significantly.
Studio monitor speakers are another key element of a more advanced configuration allowing sound control without headphones which sometimes do not give an entirely realistic impression during mixing and mastering of the production.
When you compare the list of gear that is part of my LakeView Studio, you will find the following
additional components:
- Fantom and Fantom-O workstation keyboards with built-in multi-channel, high-quality & high-resolution audio/MIDI interfaces
- Rode NT1A and/or Rode Wirless GO! microphones
- Stereo pair of Adam Audio T7V near field monitors
- Pop filter (Millenium, Thomann)
- Screen shield (T.Akustik Mixscreen Flex)
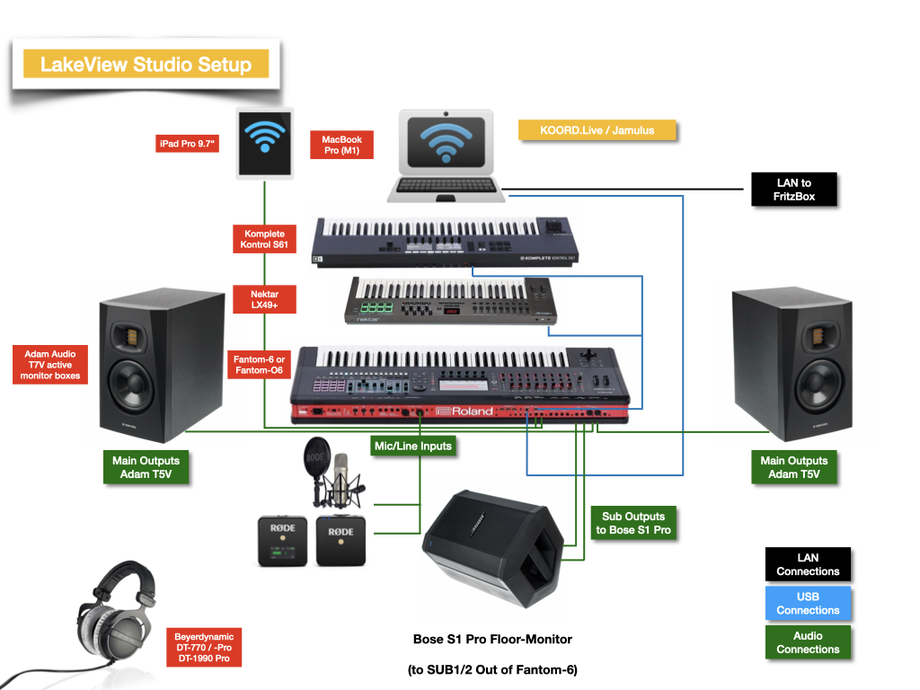
My LakeView Studio Line-up
The schematic below illustrates the current configuration of my "LakeView Studio" providing an overview of all components and how they are wired and connected.
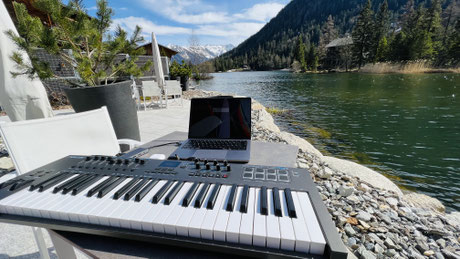
In addition to the Fantom-6 workstation, I also use the more portable (6 kg weight) Fantom-O6 when doing external gigs or recordings "on the go" or other locations. Since Fantom-6 and Fantom-O6 workstations are basically data-compatible units having more or less the same sound library and technical specs, it is quite easy to transfer existing scenes and songs between the two Fantom's. This allows to arrest the "big" Fantom-6 within the studio, whereas the lighter Fantom-O6 is carried to gigs and external locations.
The Bose S1 Pro is also a very portable, powerful and good sounding mini-PA and is also be used on stage as a local monitor or in addition to our full-range Bose L1 PA.
The full list of components of my "LakeView Studio" is described here.
Setting-up Your Home Studio
Now that you know the basics of home recording, let's walk through the steps of setting up a basic home studio for a keyboardist.
Step 1: Connect Your Equipment
Now that you've chosen your software, audio interface, and microphones, it's time to connect everything together. Here's a basic set-up:
1. Connect your keyboard to your audio interface using an instrument cable (if you use a stand alone audio interface).
2. Connect your audio interface (stand alone or integrated into a keyboard workstation) to your computer using a USB cable.
3. Connect your microphone to your audio interface using an XLR cable (in some cases, adapters may be necessary).
4. If you're using multiple microphones, connect them to your audio interface using additional XLR cables.
Step 2: Configure Your Software
Once your equipment is connected, it's time to configure your recording software. This will vary depending on which software you're using, but here are some basic steps:
1. Open your recording software.
2. Choose the correct audio interface in the software's preferences.
3. Create a new session or project.
4. Set your input levels. Make sure your keyboard and microphone levels are set so that the recording is clear but not distorted.
5. Choose your recording format and quality. This will determine the file size and quality of your recordings.
Step 3: Start Recording
Now that your home studio is set-up and configured, it's time to start recording! Here are some tips for getting the best possible sound:
1. Make sure your instrument is in tune before recording.
2. Experiment with microphone placement to find the best sound. Different microphones and polar patterns will require different placement.
3. Make sure you're playing at a consistent volume throughout the recording.
4. Consider acoustic treatment to reduce unwanted noise and echo in your recording space.
5. Listen critically to your recordings and adjust your settings as needed.
Conclusion
Setting up a home recording studio for a keyboardist can be a fun and rewarding project. With the right equipment and some basic knowledge, you can create high-quality recordings of your playing that you can share with the world.
Remember that recording is an art form, and it takes time and practice to develop your skills. Don't be afraid to experiment and try new things. With a little bit of patience and persistence, you can create recordings that capture the essence of your playing and bring your music to life.
Write a comment